Fascia boards and soffits sit at the edge of every roofline. They close the gap between the roof structure and the outer wall, carry the guttering system, and channel fresh air into the loft space. When either component deteriorates, rainwater can work its way into the roof, insulation absorbs moisture, and timber rafters begin to break down from within.
Replacing soffit and fascia is a job that often comes up during roofline upgrades or when new guttering is being fitted at the same time. With good preparation and the right tools, the job is achievable, but it demands accurate measuring, careful working at height, and proper attention to ventilation. As experienced roofers in Chelmsford, BestWay Roofing Ltd is on hand if you need professional support at any stage.
This guide walks through how to install soffit and fascia, why each step matters, and what UK homeowners should keep in mind throughout the process.
What Fascia Boards and Soffits Actually Do
Getting clear on the function of each component makes soffit and fascia installation much easier to follow.
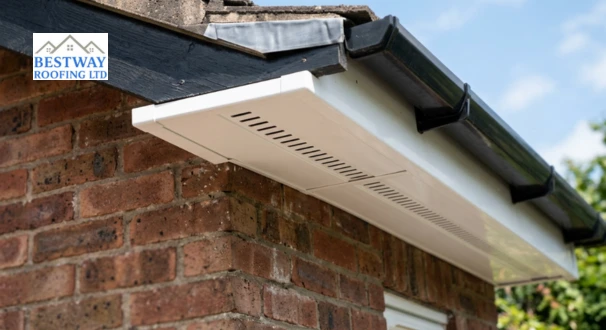
Fascia Board
The fascia runs horizontally along the roofline, fixed directly to the rafter feet. It sits at the front edge of the roof and serves several purposes:
- Provides the mounting surface for gutter brackets
- Shields rafter ends from direct weather exposure
- Gives the roofline a neat, finished appearance
Older properties often have timber fascias, but most modern uPVC roofline installation in the UK uses uPVC boards. They hold up better in wet conditions and need very little ongoing maintenance.
Soffit Board
The soffit fills the gap beneath the fascia, spanning from the fascia to the wall. Its main roles are:
- Protecting the underside of the roof overhang from moisture and debris
- Allowing fresh air into the roof void through ventilation slots
- Preventing birds, insects, and windblown material from entering the loft
Working together, fascias and soffits form a durable roofline barrier that keeps the structure dry and properly ventilated year-round.
Tools and Materials You Will Need
Tools
- Tape measure and chalk line
- Spirit level
- Circular saw or handsaw
- Drill or impact driver
- Hammer
- Ladder or scaffold tower
Materials
- uPVC fascia boards
- uPVC soffit boards or vented soffit panels
- Starter trims and corner trims
- Stainless steel or galvanised fixings
- Ventilation strips (where required)
- Timber battens for wall fixing
Corrosion-resistant fixings matter in the UK climate, as standard screws will rust and stain uPVC boards relatively quickly.
How to install Soffit Boards and Fascias: Step-by-Step
Whether you are upgrading an old timber roofline or fitting uPVC for the first time, knowing how to install soffit boards and fascias properly makes all the difference. Here is a clear, step-by-step breakdown to help you get started.
Step 1: Assess the Existing Roofline
Before replacing soffits and fascias, begin by stripping back the old guttering, soffit panels, and fascia boards. Once removed, work along the rafter feet and inspect the felt carefully.
Signs to look out for:
- Soft or rotten timber at rafter ends
- Damaged or torn roofing felt
- Evidence of pest entry or long-term damp
Any structural faults need to be addressed at this stage. Fixing new boards over compromised rafters will cause gutter movement and sagging further down the line. If the existing felt does not overhang far enough to direct water into the gutter channel, install felt support trays before proceeding.
Step 2: Fix Wall Battens to Support the Soffit
Soffit installation begins by providing the boards with solid fixing points at both edges, against the wall and along the rafter ends.
Run a timber batten along the wall at the correct height to support the soffit’s inner edge. Use a spirit level as you work; a batten that drifts out of line will result in misaligned panels across the full run. Fix at intervals of roughly 600 mm to give the soffit enough support without the batten flexing.
Step 3: Measure, Cut, and Fix the Soffit Boards
Measure the gap between the wall batten and the rafter ends. On most UK homes, this falls between 300 mm and 400 mm, though roofline proportions vary by property and roof design.
For soffit fitting, cut soffit boards to width, then slot the wall-side edge into the J-channel or starter trim before securing the outer edge to the rafter feet. When fitting vented soffit panels, keep the ventilation slots facing downward and make sure nothing blocks airflow into the roof void. Good airflow through the soffit prevents condensation from building up in the loft, a problem that leads to mould, damp, and eventually timber decay.
Step 4: Fit the Fascia Board
With the soffit secured, the fascia installation can begin. Position the board against the rafter ends so it overlaps and covers the front edge of the soffit boards. This is the stage where knowing how to attach fascia board correctly makes the biggest difference to the finished result.
Drive stainless steel screws directly into the rafter feet at each fixing point. A typical spacing runs:
- At every rafter position
- Roughly 400 mm to 600 mm along the run
Check that the fascia is running level as you work. Any lean or bow in the fascia will become obvious once gutter brackets are added.
Step 5: Connect Boards and Seal Corners
For longer roof runs, fascia board installation requires joining multiple board lengths. Use H-connectors or fascia joint trims, and leave a small expansion gap at each join to allow uPVC to move with temperature changes.
Both external and internal corners need dedicated corner trims. These trims seal the junction, keep water out at roofline angles, and give the finished uPVC fascia installation a professional appearance.
Step 6: Provide Adequate Roof Ventilation
The UK’s climate means roof ventilation is not optional. It is a requirement for keeping loft spaces healthy and dry.
Options for achieving ventilation include:
- Prevented soffit panels with built-in slots
- A continuous ventilation strip running along the eaves
- Circular push-in soffit vents at set intervals
Building regulations generally call for at least 10 mm of continuous airflow at eaves level. Without it, warm, moist air inside the loft has nowhere to go, leading to condensation, mould growth, and long-term damage to roof timbers.
Step 7: Attach the Guttering
The final stage is mounting the gutter system onto the installed fascia. Mark the fall angle first. A slope of around 1:600 toward the downpipe provides sufficient gradient for rainwater to drain efficiently without pooling.
Space gutter brackets evenly along the fascia and clip gutter sections into place. Because the fascia carries the full weight of the guttering and everything collected during heavy rain, every bracket must be fixed into solid rafter timber, not just into the fascia board itself.
Installation Mistakes That Cause Problems Later
Most roofline faults trace back to errors during fitting rather than material failure. Common ones to avoid:
- Blocking ventilation slots: Paint, loft insulation pushed too far, or debris covering the soffit vents cuts off airflow completely.
- Capping over damaged timber: Placing new uPVC over rotten fascia boards without securing it to the rafters creates a weak gutter fixing point that will eventually fail.
- Felt not directing water forward: If the roofing felt runs behind or flat against the fascia rather than angling into the gutter, moisture tracks back behind the board instead of draining away.
- Using non-resistant fixings: Ordinary steel screws rust quickly in exposed roofline conditions, leaving brown staining on uPVC surfaces.
When to Call a Professional
Many confident DIYers manage replacing fascia and soffit without difficulty, but certain situations call for professional roofing contractors.
Working safely at height is the most significant concern on taller properties. Multi-storey homes typically require scaffold access rather than just a ladder, and working safely from a scaffold requires experience. Complex roof shapes with dormers, valleys, or multiple angles also add difficulty beyond a standard straight run.
Situations where bringing in a professional makes sense:
- Properties with two or more storeys needing full scaffold access
- Significant rafter rot requiring structural repair alongside the roofline work
- Roof replacement projects that include the full roofline as part of a wider job
- Complex roof geometry with multiple angles, hips, or dormers
BestWay Roofing Limited carries out uPVC fascia and guttering in Chelmsford and across the surrounding area. Our team can assess the condition of your existing roofline.
Conclusion
Replacing or fitting fascia boards and soffit panels protects the roof structure, supports the guttering system, and ensures the loft receives enough airflow to stay dry. When properly done, with the right preparation, solid fixings, and adequate ventilation, a well-fitted roofline will perform reliably for decades.
If you would prefer the job handled by experienced hands, contact us today, and we will provide a no-obligation quote for the work involved.
FAQs
Do fitting vented soffits make a real difference to roof health?
Yes. Vented soffits allow fresh air to circulate through the roof void, which prevents condensation from forming on roof timbers and insulation. Properties without adequate eaves ventilation often develop damp and mould problems inside the loft.
What affects the price of fascia board installation?
The main cost variables are property height and access requirements, the extent of any rafter damage that needs to be repaired first, the materials chosen, and the length of the roofline being fitted. Removing and disposing of old boards also adds to the overall cost.
Why do most modern rooflines use uPVC rather than timber?
uPVC does not absorb moisture, rot, or require painting. Over a 20- to 30-year lifespan, this makes it significantly lower-maintenance than timber, which requires regular treatment to survive the wet British climate.